Cityscapes

While traveling on business to Jacksonville and Tallahassee I snuck in some photography time and captured some Cityscapes just at or after sunset. I tried to use the moving car lights to create some interest and give the image an active feel. I like the results of both images. One is downtown Jacksonville and the other is the Florida Capital in downtown Tallahassee.

NASCAR Championship 2015 at Homestead Miami Speedway

I had the opportunity once again to do some freelance work for the local newspaper and photograph the 2016 NASCAR Championship race at Homestead Miami Speedway. This year proved to be more exciting than last year. I also managed to capture a signature sunset shot with sunburst under the sky boxes over turn 1. The image also captured the last lap led by Jeff Gordon prior to his retirement.

Myakka State Park

I had a conference to attend in the Tampa area and decided to bring my camera with me and stop by Myakka River State Park on my way back south to Miami. I first visited Myakka years ago when I was only 10 or so but remember being impressed with its numerous and large alligators. I returned about 4 years ago for the first time since I was 10 and spent a day exploring and hiking some of the trails. This time I did not have much time to spend in the park but still enjoyed what little time I did have there.

I managed to capture some interesting landscape shots and even tracked a few deer that where skittish but curious about my presence. All in all it was a good trip. One of these days I would like to return to spend some time kayaking the river and/or camp in the campground.

Sand Key Beach Sunset

While visiting family in Largo, Florida I took my camera to Sand Key Beach to see if I could capture a sunset. I grew up in Largo and have not been back to Sand Key Beach since I left for college many, many years ago. It looked just liked I remembered it. I captured one sunset image I really liked with the curved moon low on the horizon just above the setting sun. I used a long shutter speed to smooth out the water and saturate the colors. I was hoping for a little bit more movement feel in the water near the rocks but still like the final result.

Coco Cay Bahamas

My wife and I decided to take a quick weekend getaway to the Bahamas aboard a Royal Caribbean Cruise ship. It was only a 3 day itinerary but it was nice to leave the borders of Florida if only for a few days. We spent some time in Nassau and then went to Royal Caribbean’s private island Coco Cay. I have been to the Bahamas a multitude of times but never to Coco Cay. It was a nice little tourist trap but probably not somewhere I would be quick to try and return to. I did enjoy there little reef area where there were a good number of colorful rocks, sea fans, coral and of course tropical fish.

I opted to use my new Outex underwater cover over my older T2i instead of my Canon 5D Mark iii. I am glad I did because I accidentally hit a rock while chasing a fish causing a break in the seal and letting just enough water in to brick the camera. However, before the camera died I did manage to get some decent underwater shots of some of the tropical fish including a flag yellow tail. I have used the Outex cover numerous times before with no problems and even a few time since. The failure was a result of my bumping the rock with the front glass element that seals around the neoprene cover. I then did not surface to check to make sure the seal was intact. Instead I kept chasing fish and ultimately ended up with about a tablespoon of water inside the cover. This still would not have likely been a problem except I started shooting directly straight up which caused the water to eventually find a weakness in the camera body and short it out. Moral of the story is check your seal periodically especially when you bump underwater objects with it.

Below are some the images I captured before the water intrusion.

Perseid Meteor Shower 2015

The conditions for the Perseid Meteor Shower this year were ideal so myself and a photographer friend, Robert Chaplin, ran out to the Everglades to see if we could capture some in photographs. It turned out we could.

For this meteor shower we had planned to head over to the Big Cypress National Preserve but due to less than ideal weather conditions made a last minute call to head south to Flamingo in Everglades National Park instead. Except for the mosquitoes it turned out to be a good decision that resulted in some good images. I even managed to capture a lightning bolt to go along with the milky way and meteors.

The Flamingo campground area provided a good variety of foreground subject to use to anchor the vast sky and compliment the shooting stars. The meteor shower peaked between 3 and 4:30 in the morning. During the peak I was seeing a meteor almost every second with numerous bright fireballs.

It was definitely worth the mosquito bites and the lack of sleep. I am already looking forward to Decembers Geminids.

Palm Island Cape Haze, Florida

This year my family and I took a much needed vacation to Palm Island Resort in Cape Haze, Florida. Palm Island is a beautiful and quiet destination with miles of undisturbed beaches and plenty of sea shells. I brought my camera with the hope of capturing some vivid west coast sunsets. The first 3 days or so did not cooperate with cloudy and raining skies. However, the last few days made up for the first few days with some great sunsets.

The only problem I had was trying to compose the shots with something interesting in the foreground so that the image would be more dynamic. I had to get creative as nothing jumped out at me. To make it harder I was also trying to keep an eye on my one year old while trying to set up my shot. All in all I am happy with the results.

On this trip I also had an opportunity to use my Outex cover some more. I really like this cover as it gave me the opportunity to create some unique photos that would have been impossible without it. I am still figuring it out but I am making progress.

KC-135 Stratotanker Mid Air Refueling of F-16’s

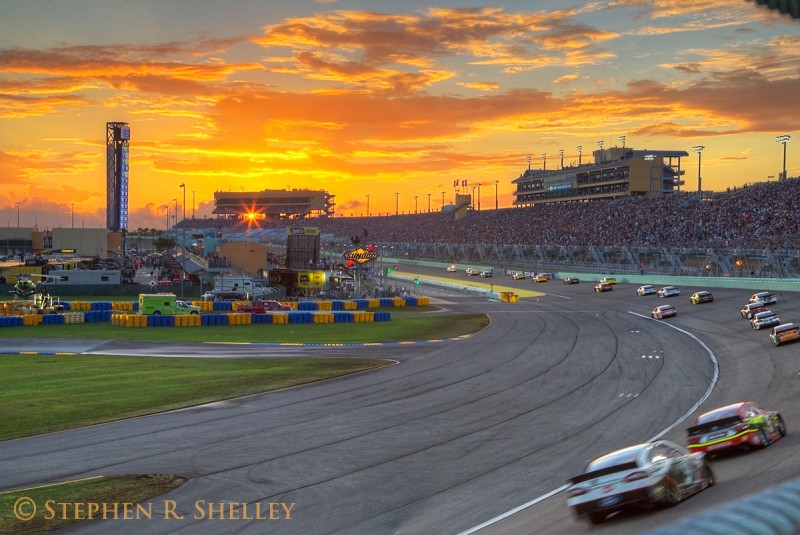
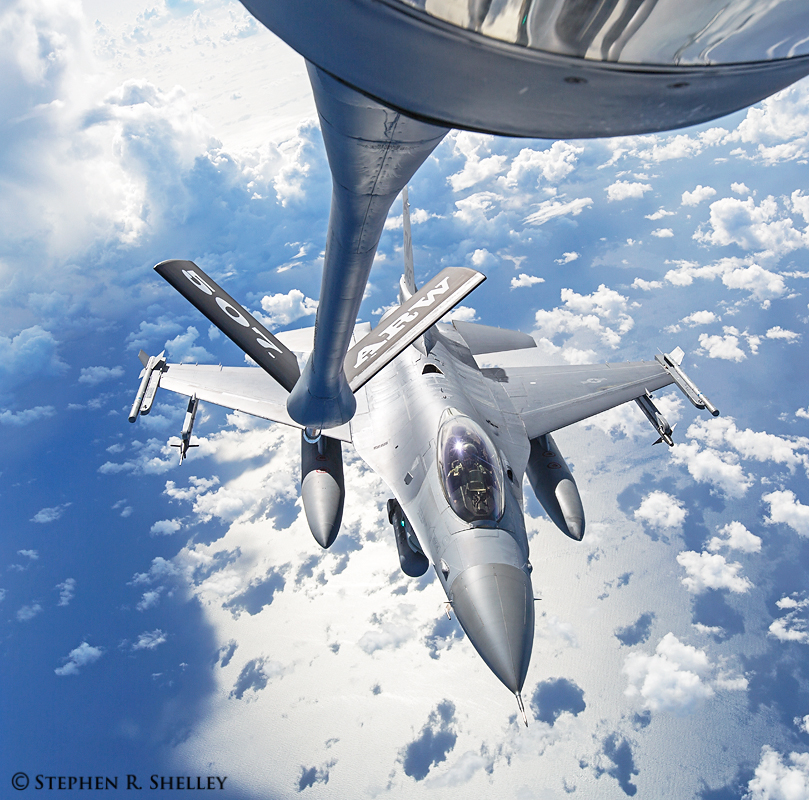
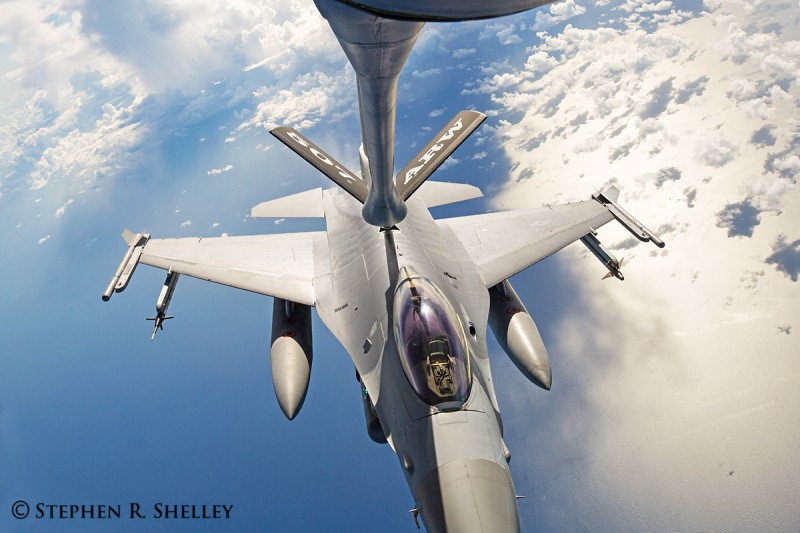
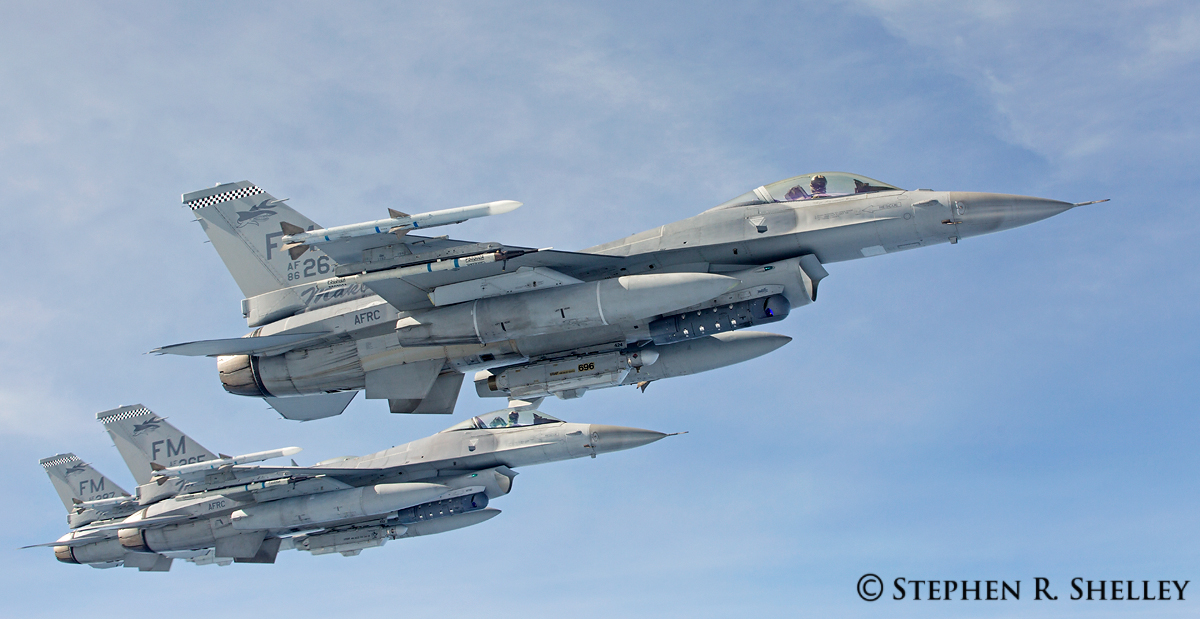
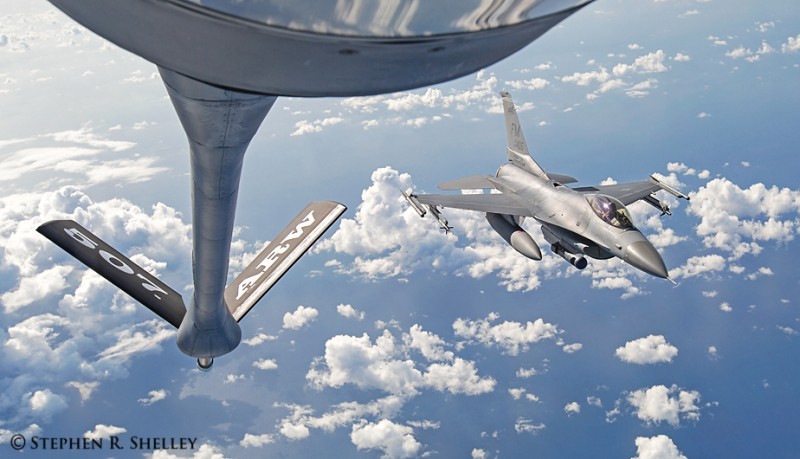
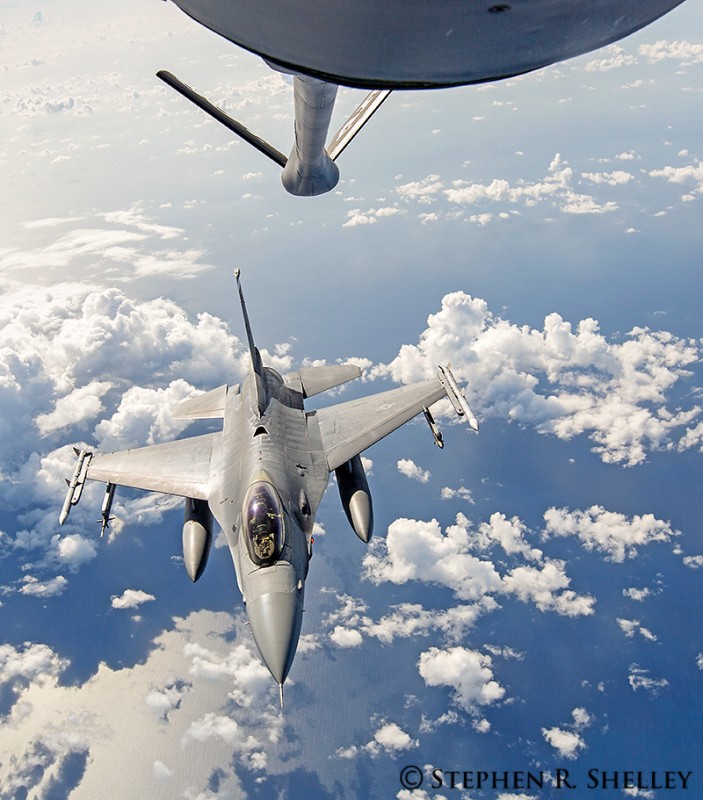
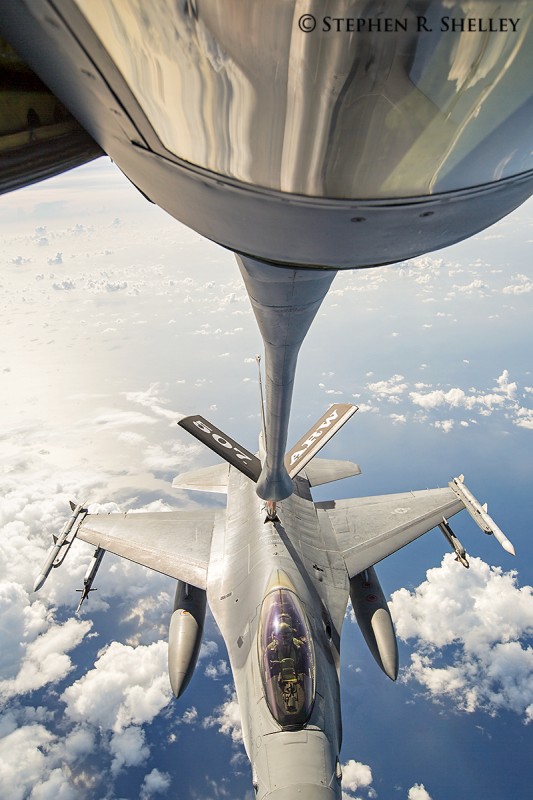
I had the opportunity to fly in a KC-135 out of Homestead Air Reserve Base this past week on a training mission to refuel F-16’s over the Gulf of Mexico. The F-16 MAKOS from 482nd Fighter Wing out of HARB were participating in simulated dog fights and training exercises as well as mid air refueling.

The KC-135 only has 4 small windows in the side of the plane. Two on the front doors on either side of the wing and two toward the tail of the plane. This made it difficult to frame my shots as there were not many viewing options in addition to not much room to work with without getting the edge of the window in the viewing frame. Also, like most airplanes the windows are made from a thick acrylic that has various scratches across its surface. I was afraid this would have an effect on the image quality but except for a few images, the final product was not really affected.

In the belly at the back of the plane is a space for the Boom Operator. The Boom Operator is responsible for lining up the approaching aircraft and successfully mating the boom (fuel hose) with the fuel receptacle on the airplane. To accomplish this their is a medium sized window at the rear of the plane just below the boom for the operator to look out of and gauge the distance to the plane to be refueled. Their is space on either side of the operator for other workers, or in this case observers, to watch the refueling process. This is also the only space available to try and capture a photo of the approaching F-16’s. Once the F-16’s are connected to the boom they are so close that their nose cone is located below the window and therefore out of sight of the camera’s lens. During the fueling process the plane was less than 30 feet from the back of the KC-135.

Each F-16 only took 2-3 minutes to fill up their tanks before disengaging and moving out of the way for the next F-16 to arrive. Prior to refueling, the F-16’s would stack up on the left side of the plane and then one by one drop down to refuel. After refueling, the pilot would then move to the right wing and stack up waiting for the other planes. All of this was taking place at around 34,000 feet and nearly 500 knots.

One thing I noticed was that each time a plane successfully attached to the boom the entire plane would sink and lose altitude for a few seconds before leveling back off.

For the refueling, I chose to use my Canon 16-35 f/2.8 II lens to ensure that I could capture the entire plane and some of the surrounding landscape. This required me to reach all the way up to the window to ensure that I did not get any glare from the window and also did not capture the inside of the airplane. For the side window shots over the wing I used my Canon 70-200 f/2.8 II to allow me to get tighter crops on the planes than I could capture with my wide angle lens. I shot in aperture priority to ensure my depth of field was sufficient to capture the entire plane and boom in focus. It was a very sunny day, especially at 34,000 feet so I had plenty of light to work with.

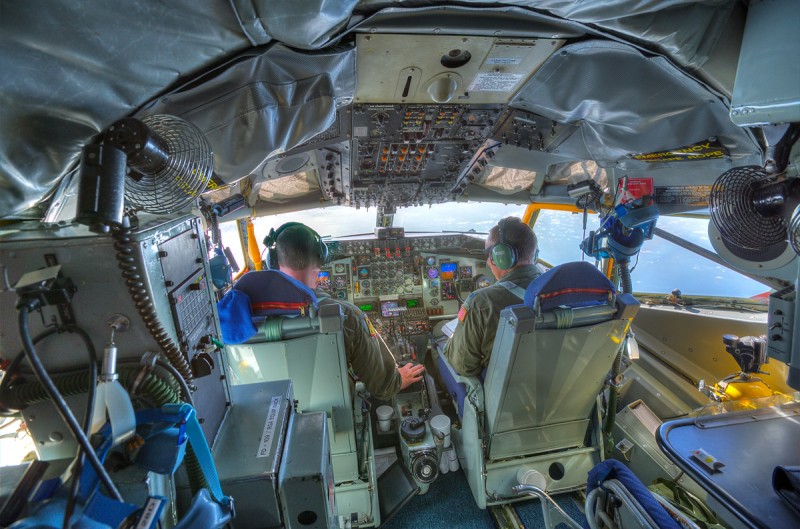
On the way back from the training exercise I was able to sit in the cockpit on approach and while landing. It was a very unique experience both educationally and photographically.

Keeping Lens Filter From Binding Onto Camera Lenses

I frequently use lens filters with my lenses for my landscape photography such as circular polarizers, neutral density filters and step up rings. Inevitably they always seem to get stuck on my lenses at the most inopportune time. I then spend the rest of my photo shoot trying to get the lens off or, if I just leave it on and try to work around it, frustrated that the lens filter is stuck.

Luckily, I have always eventually been able to remove the stuck filter. The same cannot be said for some other photographers I have spoken to. Some of them have had filters on their lenses that have been stuck for years. After the most recent occurrence I started thinking there had to be some way to keep this from continuing to happen. After spending some time researching I finally found a solution that works and thought I would pass it on to my fellow photographers.

From my research there were two (2) primary approaches to keeping lens filters from remaining stuck in perpetuity. The first was using tools to remove filters after they were stuck, the second was taking preemptive action to keep them from getting stuck in the first place.

For removing already stuck lens filters it seems the best tool for the job is a lens filter wrench. These cheap accessories apply equal pressure to the filter and from all accounts easily remove the filter from the lens. The lens wrenches usually come in packs of two (2) and can be had for less than $10.00 at your local photo supply store. Even if you take preemptive actions it is not a bad idea to own and carry this item with you on your photo excursions.

To keep lens filters from becoming stuck in the first place, the best solution is to use good old pencil lead. Turns out pencil lead is primarily made from graphite. Graphite is a great dry lubricant and does not cause a mess, smear on the lens or attract additional dirt and grim that is likely to cause the lens to get stuck even more frequently. Without getting into to much detail, pencils are labeled based upon the level of graphite they contain. The softer the lead the more graphite it contains. The softest pencil available is a 9B the hardest is a 9H. These pencils are typically only found at your local hobby store. However, many people use the standard No. 2 pencil as well. Here is a link to a more detailed explanation of pencil hardness http://www.cultpens.com/pencyclopedia/lead-hardness.

For me I went to my local hobby store and picked up a 6B which happened to be the softest they had in stock at the time. When I got home I proceeded to rub the lead on the threads of my lenses and my filters. I then blew off any excess powder than did not stick to the threads. I am happy to say that I have not had any stuck filters since taking this preemptive action. I also now carry a lead pencil in my photo bag with me and occasionally add a new layer of lubrication to the filters.

Milky Way Landscapes Everglades National Park

I took advantage of the new moon last week to head out to Everglades National Park to try my hand at capturing some unique Milky Way Landscape shots. Everglades National Park is one of the few dark sites here in South Florida where one can actually see the Milky Way with the naked eye. I wanted to try and use the Milky Way to compliment the overall scene.

To accomplish this I took two (2) photos with an aperture at f/2.8. One focused on the foreground subject and the second focused on the night sky. I then combined the two (2) images together to ensure that both my foreground subject and the Milky Way were sharp and in focus. The exposure times were around 25 seconds. I used a handheld flash to illuminate the foreground during the exposure.

Click on Thumbnails for full image.